Templates and documents
Design emails and documents such as invoices once, filled in with a record's details, and make a PDF of one from any record.
A template is an email or a document you design once and fill in with the details of one record: an order confirmation, an invoice, a certificate. You write it as it looks, put placeholders where a record’s details go, and kvyk.ai fills them in.
There are two kinds:
- An email template has a subject and a text, and can take documents along as attachments.
- A document template makes a PDF, such as an invoice, with a header and a footer on every page and page numbers. The PDF is kept with the record it was made for.
Builders and Administrators design templates. Everyone who may read a record can make a document from it.
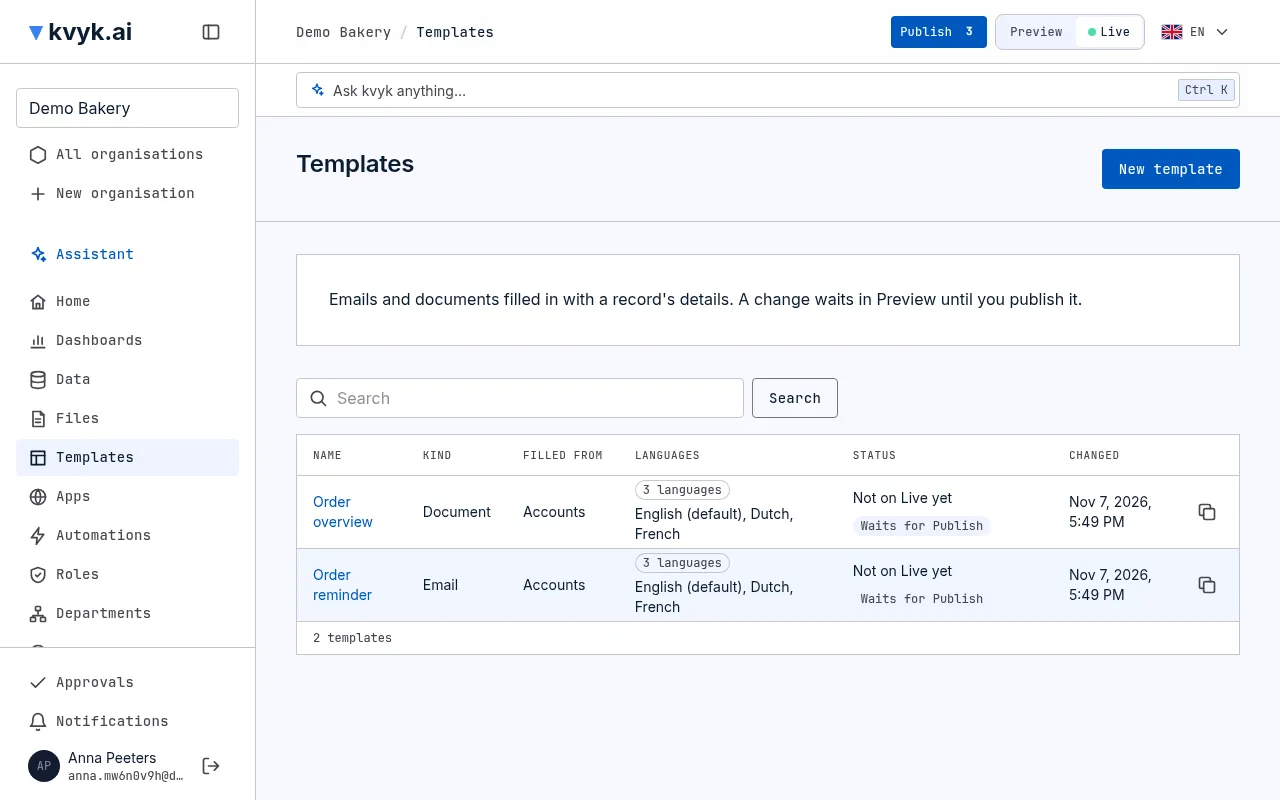
Make a template
Section titled “Make a template”- Choose Templates in the menu, then New template. You can also start one from a record’s page, with New document template under Documents or New email template under Send email: what it makes and its entity are then filled in.
- Choose what it makes, an email or a document, give it a name, choose the entity it is filled from, such as Orders, and the Language you write it in. You can add other languages later.
- Under Start with, choose An empty template, An example or Ask the assistant.
- Choose Create template. The editor opens. While the name or the entity is missing, the form says so beside it.
Start from an example
Section titled “Start from an example”The examples are an invoice, a quote, an order confirmation, a letter and a welcome email, with their text and layout ready. Where a record’s details go, an example shows Pick a field for: and what belongs there, such as Invoice number. Click it and pick the field of your data that fills it; for a table, pick the rows it shows and the fields of its totals.
You can save an example with fields still to pick: the editor says how many are left. A template can only be published once every field is picked.
With Ask the assistant, the assistant writes the template for you from what you tell it.
The name is the title at the top of the editor, with what the template makes and the entity it is filled from under it. Click the name to change it. A template needs a name: when you save or publish without one, the editor says so beside it.
When you leave the template with changes not saved yet, you are asked first: Leave without saving? Choose Stay on this page to go back and save, or Leave without saving. You are asked this too when the assistant opens another page for you.
Duplicate a template
Section titled “Duplicate a template”To start from a template you already have, choose Duplicate: on the template’s row on the Templates page, or at the top of its editor. The copy is called Copy of the template’s name, holds the same text and settings and opens in the editor. It is a new template: it waits for the next publish, and its published versions start from nothing.
In the editor, save your changes first: the copy is made from the saved template.
Write it
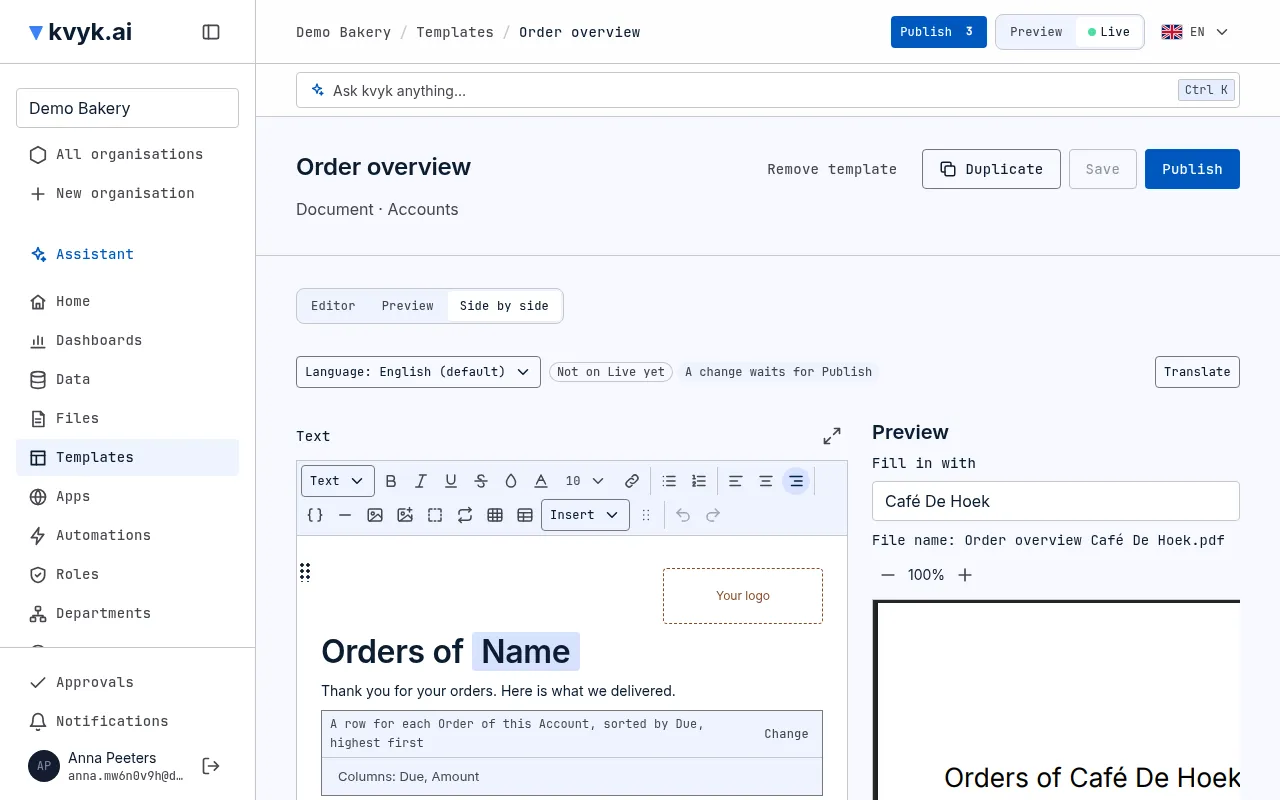
Section titled “Write it”The editor shows the template as it will look. Type your text, and use the toolbar to:
- choose a Text style: text or a heading, and a Text size in points: one of the usual sizes, any size from 8 to 72 typed under Size in points, or Normal to go back;
- make words Bold, Italic, Underline, Strikethrough or show them in your Brand colour;
- align a block with Align left, Centre or Align right, as the editor then shows it;
- give words a Text colour (see Colours);
- add a Link to words (see Links);
- make a Bulleted list or a Numbered list; Tab moves an item in one level, Shift+Tab back;
- add a Line, your Logo, an Image, a Placeholder, a Section, a Repeat for each, a Table of linked records or a Table you fill in yourself;
- under Insert, add Columns, a Space, a Button, and in a document a Page break, a QR code or a Payment QR code;
- Undo or Redo a change (Ctrl+Z and Ctrl+Shift+Z, or Cmd on a Mac).
A field of one line, such as an email’s subject, a button’s text, a QR code’s text or an address made with values of the record, has only Add placeholder.
Point at a block to see its handle beside it; the block you chose keeps its handle shown. Drag the handle to move the block, a section with all it holds too, or choose it for Move up, Move down, Duplicate and Delete.
To make the editor taller, drag its bottom corner. For more room, choose Full screen beside the text’s label: the editor and the preview fill the whole window, with Editor, Preview and Side by side. Press Escape or choose Close full screen to go back.
Choose Save to keep your changes. If someone else saved the template while you were changing it, you are asked to Load the latest and make your change again. See Working together.
Text pasted from Word or Google Docs keeps its headings, bold, italic, lists, links and tables; other formatting is left out.
The toolbar shows each of these as an icon; point at one to see its name.
Your logo and your Brand colour are the ones in your organisation details, the same your apps’ sign-in page and the mail sent in your name show. Left empty, the colour is kvyk.ai’s own. Headings use your brand colour, so your documents and emails always look like your organisation.
Colours
Section titled “Colours”Wherever you choose a colour (for text, a background, a border, a line or a button), your Brand colour and its shades come first, then the colours Used in this template, then a grid of colours from light to dark. Choose Your own colour to pick any colour or write it as # and six digits or letters, such as #1a6b3c. For a border, Transparent hides it.
Select some words and choose Link. Under Links to, choose:
- An address: a web address starting with
https://orhttp://,mailto:with an email address, ortel:with a phone number; - A value of the record, such as the customer’s website or email address, and under Opens as whether it is A web page, An email to it or A call to it;
- An address with values of the record: fixed text and placeholders in one line, the placeholders picked with Add placeholder, such as a link to the order’s page in your app. The address starts with the fixed part, such as
https://shop.example/orders/, before the first placeholder. The values are made safe for an address.
Links work in emails and in PDFs. Only these kinds of addresses can be used; when a record’s value is no such address, its text shows without a link.
Placeholders
Section titled “Placeholders”Choose Placeholder to pick what goes in that place:
- a field of the record, such as the order’s Due date;
- a field of a record it links to, such as the customer’s Name, through any link that reaches one record;
- one of your organisation details, such as your address or VAT number (see Organisation details);
- the Id of the record, of a record it links to or of a table’s row;
- a built-in field: Created on, Created by (their name), Last changed on or Last changed by;
- today’s date.
- a step value the automation that sends or makes the template gives it, such as a count (see Step values).
A placeholder shows as a label with the field’s name. Click it to change its settings; selecting across it to style or link the words around it leaves them closed. For a date, choose how it is written (31/12/2026, 31 Dec 2026, 31 December 2026, or with the weekday: Thursday 31 December 2026); for a number, choose a plain number or an amount in your currency, and the number of Decimals; for a text, choose whether it shows In capitals. Dates and amounts are written the way the template’s language writes them.
Under Text when empty, write what shows when the record holds nothing there, such as Not given.
Sections shown only sometimes
Section titled “Sections shown only sometimes”A Section holds blocks that are shown only when the record meets a condition, such as Shown when Status is Paid. Its frame says when it shows; choose Change on the frame to set the field, the comparison and the value. There you can also:
- Show something else otherwise: blocks shown when the record does not meet the condition, such as Not paid yet;
- give it a Background;
- in a document, Keep on one page in a document, so it is not split over two pages.
Columns, space, lines and buttons
Section titled “Columns, space, lines and buttons”Columns put blocks side by side, in 2 or 3 columns, such as your address on the left and the customer’s on the right. In an email, columns are shown one under the other on a phone.
A Space adds empty room of the height you choose. A Line has a colour and a thickness you can change.
A Button is a link that looks like a button. Write the Text on the button, choose its Background colour (your brand colour or another) and its Text colour, and choose where it links to, as for Links.
Images
Section titled “Images”Choose Image to add a PNG or JPEG of up to 2 MB, such as a product photo or a signature. To change its width, drag its corner. Or choose Change on the image to type its Width in pixels (600 fills the whole width) and set its Alignment and its Description, which is read out to people who cannot see the image. The image goes with the email itself and into the PDF, so it shows even when the reader’s mail program does not load pictures from the internet.
Tables you fill in yourself
Section titled “Tables you fill in yourself”A Table is a table of your own text, such as opening hours or prices, with up to 50 rows. Table layout is a row of buttons for where the cursor is: Insert a row above, Insert a row below, Insert a column to the left, Insert a column to the right, Remove this row, Remove this column, First row holds the column titles to show the first row in bold, and Borders. The cursor starts in its first cell; Tab goes to the next cell and Shift+Tab to the one before. You can put placeholders in its cells and give a cell a Cell background. Image puts an image in the cell’s text; click the image to change or remove it.
Under Borders, choose their colour and, under Lines that show, switch on the ones you want, as in a spreadsheet: Left and right edges, Between columns, Top and bottom edges and Between rows.
Tables of linked records
Section titled “Tables of linked records”A Table of linked records has a row for each record a link reaches, such as each order line of an order. Its frame says so: A row for each Order line of this Order, sorted by Position. Choose Change to pick the link, the columns, the order of the rows and the totals under the table: the number of rows, or the sum or average of a number column. A table shows at most 500 rows; when a record has more, a line under the table says how many were left out.
There you can also:
- give a column a Width in percent; the others share what is left;
- Add a computed column: pick a First number, a Calculation (times, plus or minus) and a Second number, such as quantity times price;
- total a computed column, and under A line for each give a total a line for each value of a field, such as the VAT per rate;
- choose the Title row background, Every other row’s background and the Borders, the same as for a table you fill in yourself;
- in a document, Keep each row on one page in a document.
Repeat for each
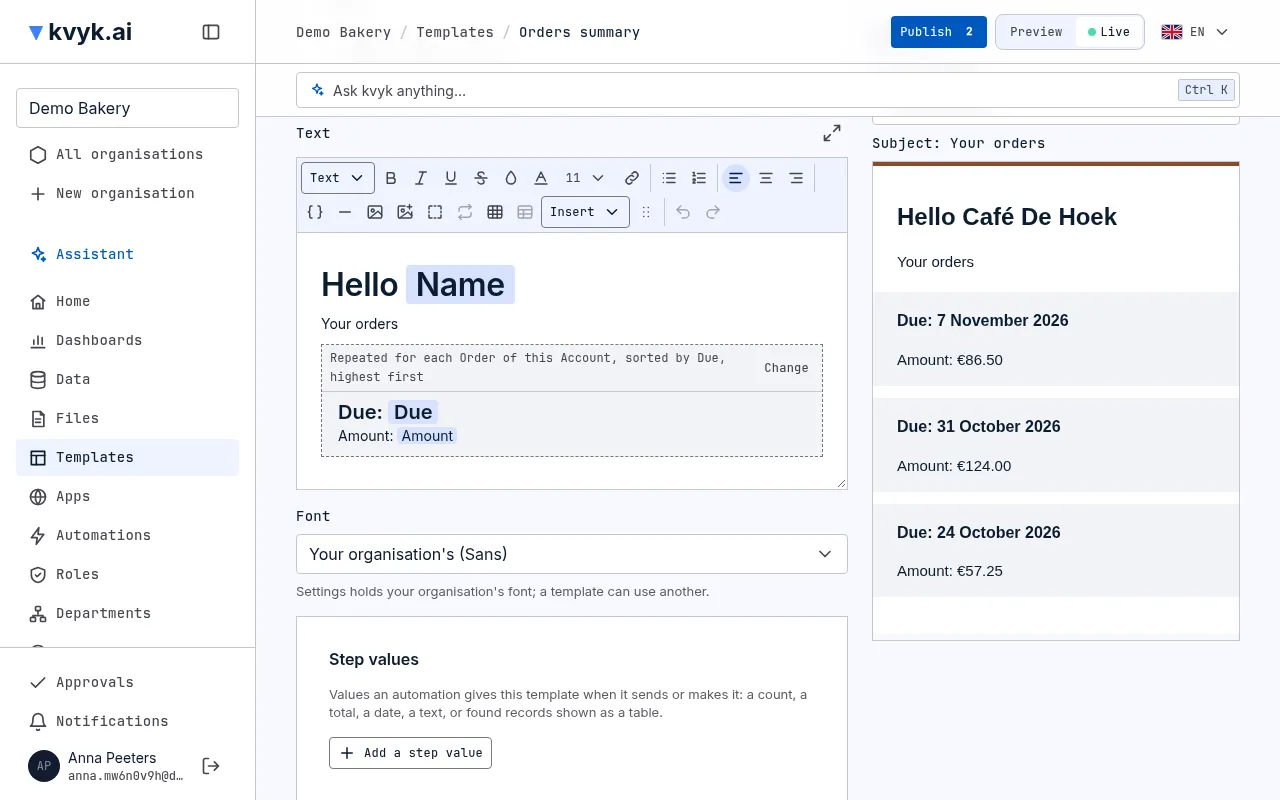
Section titled “Repeat for each”A Repeat for each section shows the blocks you put in it once for every record a link reaches, such as a card for each order line with its picture, name and price, or a paragraph for each guest. Its frame says so: Repeated for each Order line of this Order, sorted by Position. Write text, images, buttons, columns and placeholders in it as anywhere else: a placeholder inside it shows the field of each record in turn, and the fields of the template’s own record and its step values stay available.
Choose Change on the frame to set it:
- under For each of, search and pick a link of the record to several records, or a step value that holds records;
- under Sorted by, pick the field that orders them, and Highest first to turn the order round;
- under Text when there are none, write what shows when there are no records, such as No lines yet; left empty, nothing shows;
- give each record a Card background;
- in a document, Keep each record on one page in a document.
It shows at most 500 records; when there are more, a line under them says how many were left out. The preview shows the first few records. To take it away and keep what it holds, choose Remove Repeat for each. A Repeat for each section cannot hold a table of linked records or another Repeat for each.
Step values
Section titled “Step values”An automation can give a template values of its own when it sends or makes it: a number such as a count or a total, a text, a date, or a list of records it found. Add them under Step values in the settings: give each a Name, choose What it holds (Number, Text, Date or Records, with the entity they are records of) and a Sample for the preview.
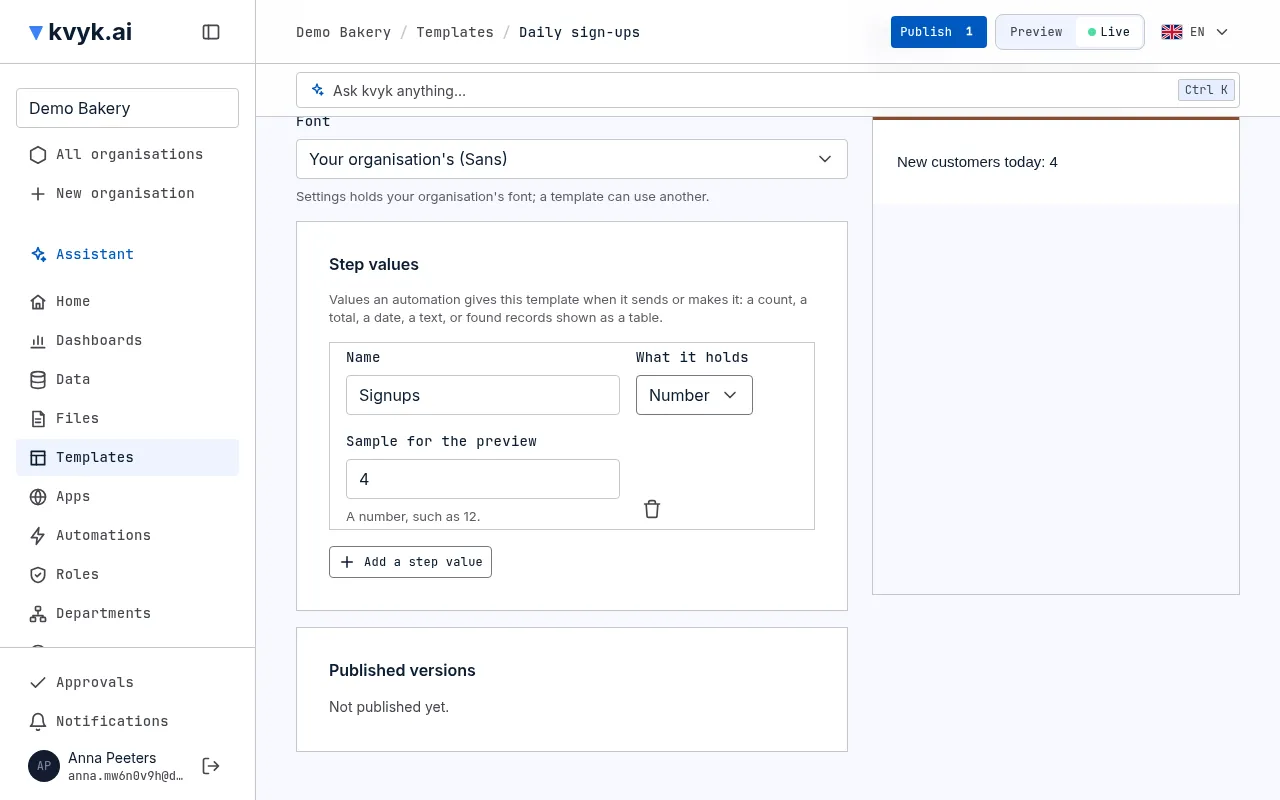
A placeholder can show a step value by its name, written like a field of its kind: a number with its decimals, a date the way you choose. A table can show the records of a step value: under How rows are found, choose Records from a step value. The preview fills each step value with its sample, and a table of records with the first few records of its entity.
A template that only shows step values needs no record to be sent. So every day, mail me how many customers signed up is one email template with a Signups step value, and one automation: a schedule, Summarise records to count them, and Send email (see Automations).
QR codes
Section titled “QR codes”In a document, a QR code holds a text or an address, with values of the record if you like, such as a link to the order. In a web address, such as https://shop.example/orders/ followed by a placeholder, the values are made safe for an address.
A Payment QR code lets your customer pay by scanning it with their banking app: a SEPA transfer to your organisation’s name and IBAN from your organisation details, with the Amount from a number field, in euros, and the Payment reference you write. When the IBAN or the amount is missing or not valid, the code is left out, and the preview and the document’s maker are told why.
Languages
Section titled “Languages”A template is written in one language to start with, the one you chose when you made it. You add each other language as a version of its own, in any language: Dutch, French, German, Spanish and so on.
- Above the editor, under Language, choose Add a language.
- Search for the language by its English name or by its own name, such as Nederlands or Deutsch, and choose it.
- Under Start with, choose An empty version, or a translation of a language the template already has.
- Choose Add, check the text, and save.
Each language has its own text and its own layout: changing the Dutch version never changes the English one. A translation copies the layout of the language it comes from, with its placeholders, sections, tables and images, and translates only the words. To translate a version again later, choose Translate, the language to Translate from, and Translate; its text and layout are replaced by the translation. Translating counts towards your organisation’s use of the assistant.
Above the editor, one row holds the Language, what it says about that version, then Translate, Make default and Remove language at the end. Choose the Language to see all its versions, search them and switch to another. Each one says whether it is On Live or Not on Live yet, whether a Change waits for Publish, and whether it is Not written yet: a version needs some text and, for an email, a subject before it can be published. The default language is marked Default, and Add a language is at the bottom of the list. The Templates page shows how many languages each template has. To take a language off, choose Remove language; Live keeps it until the next publish.
The default language
Section titled “The default language”One language is the template’s default: at first the one you made it in. To change it, switch to another language and choose Make default. An email is sent in the recipient’s own language when the template has that language on Live, and in the default language otherwise; a document is made in the default language unless you choose another. A template can only be published once its default language is written.
Preview it with a record
Section titled “Preview it with a record”Above the editor, choose what you see: the Editor, the Preview, or both Side by side. Your choice is kept for the next template you open.
The Preview shows the template filled in with a record you choose under Fill in with (search for it by name), in the language you are writing. It is made exactly as the real email or PDF will be: a document shows at its real page size, page by page, and you can zoom in and out.
If the preview leaves a placeholder empty because you may not read that field, it says which, and it also names the placeholders the record has no value for. When the preview cannot be made, it says why in plain words. The same happens for everyone who makes a document: each person’s documents show only what they may read.
Email templates
Section titled “Email templates”The Email card holds its settings in groups:
- In the inbox: the Subject of the language you are writing and its Preview text, the line a mail program shows after the subject before the mail is opened;
- Look: the Background around the mail;
- Attach documents: up to three document templates filled from the same entity. The documents made from them go with the email;
- Test: to see the mail in your own inbox, choose a record under Fill in with, save, and choose Send a test to me. The test goes only to your own email address, in your organisation’s name.
Send an email from a record
Section titled “Send an email from a record”When an email template is filled from a record’s entity, the record’s page has a Send email button. On Live, the template must be published first.
- Open the record and choose Send email.
- Choose the Template, if there are several. Under Language, The recipient’s language sends it in their own language where it is known, else in the template’s default language; or choose one of the template’s other languages.
- Check the address under To. It is filled in from the record’s first email field; change it to send the email elsewhere.
- Read who it goes to, and choose Send email.
The email is filled in with what you may read, sent in your organisation’s name, with the documents of the template attached. Sending it shows in the record’s history and in the event log.
Document templates
Section titled “Document templates”The Document card holds its settings in groups:
- Page: the Page size (A4, A5 or US Letter), the Orientation (Portrait or Landscape), the Margins in millimetres, and a switch to Number the pages (Page 1 of 3);
- Look: a Page colour and a Background image, such as your letterhead, shown as a small picture once chosen. Under Size, choose Fit (keep its proportions), Stretch to the page, Fill the page (crop) or Tile, with the Tile width (mm) from 5 to 200; under Shows on, Every page or The first page only;
- File name: the name of each document made, with values of the record if you like, such as Invoice and the invoice number;
- Keeping: how long documents made from it are kept (see Keeping documents).
Top of every page and Bottom of every page are cards of their own, each with a switch: switch it on to write what goes there, or off to empty it. Under Top of the page shows on, choose Every page or The first page only.
Under Font, choose the template’s font: Sans, Serif or Monospace. Left as it is, it uses your organisation’s font from the organisation details.
Publish it
Section titled “Publish it”A new or changed template waits in Preview, like a change to your data model. Each language is published on its own: a written language goes to Live, and one not written yet stays as Live has it. Saving says Saved, waits for Publish.; it goes to Live when it is ticked in the publish panel (see Publish changes). Until it is published, documents on Live are made from the version Live has.
To publish the template, choose Publish at the top of it. A changed template is saved first, and when fields are still to pick, it says which first. Then the publish panel opens with this template ticked; other templates and work that waits, a colleague’s too, stay unticked under Also waiting and keep waiting unless you tick them.
Every published version is kept. Under Published versions, choose Put back on an earlier one to bring it back into Preview; it reaches Live with the next publish.
When a publish changes how long documents are kept, an Administrator confirms it with Confirm and publish.
A template already on Live is checked whenever data model changes are published. When they would delete a field, link or entity it uses, the publish is refused and names the template and the placeholder: fix the template in Preview and publish it together with the changes, or leave the changes out. Renaming a field is fine: the template follows it under its new name.
Make a document
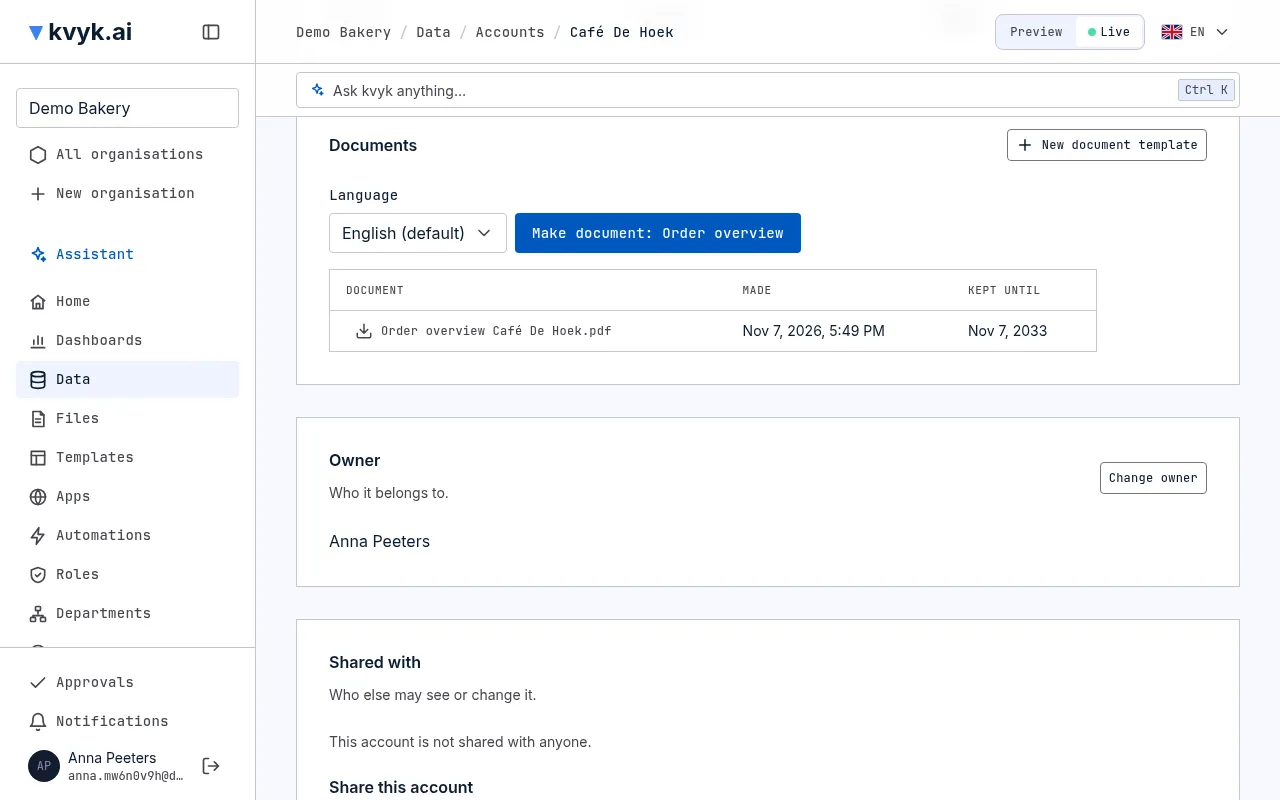
Section titled “Make a document”On a record’s page, under Documents, choose the template and the language (the template’s default language unless you choose another) and choose Make document. The PDF is made, checked for viruses and kept with the record, in the list under Documents, where anyone who may read the record can download it.
A document is filled in with what the person making it may read. If a placeholder was left empty for that reason, the list says which.
Apps can make documents too, in the same way.
To see every document made for an entity’s records, open the entity in Data and choose Documents. The list shows each document, newest first, with its record, template, who made it, when, and until when it is kept. It holds only the documents of records you may read.
Keeping documents
Section titled “Keeping documents”A document goes with its record: when the record is deleted, or a customer it belongs to is erased, its documents go too. Erasing a customer also removes the documents that name them on other records: those filled in with their details, and those made for a record linked to them, such as their orders.
Some documents must be kept for a number of years by law, such as invoices. For those, under Made documents are, choose Kept for a number of years after their record is erased and the number of Years, up to 30. Such documents are made as PDF/A, the format for keeping documents for many years. The list under Documents shows until when each one is kept. Such a document stays when its record goes, and is erased when the years are over. An Administrator confirms this when publishing the template, and an Administrator erasing a customer sees which documents stay.
Organisation details
Section titled “Organisation details”The Organisation details card in Settings holds what your documents and emails show about your organisation wherever a template places it: your address, VAT number, registration number, IBAN, email address, phone number and website, the Currency for amounts and the Font your templates use, with your Logo and Brand colour. Only Administrators change them.
Ask the assistant
Section titled “Ask the assistant”The assistant can design a template with you. Ask it, for example, “Make an invoice template for orders, with the order lines and their total” or “Add the customer’s VAT number under the address”, or to write it in another language: “Add a German version of the Reminder email”. See The assistant.
It can also do these for you, each only after you confirm on a card that says what will happen:
- Save a whole template: make a new one, or start an existing one over, such as “Redo the Reminder email: a short greeting, the amount due and the due date”. The card says what fills it, how many blocks it holds, and that what the template holds now is replaced. A template you have open is changed right there instead, so nothing you type is lost.
- Remove a template: “Remove the old Certificate template.” Documents already made with it stay with their records.
- Send a test email to yourself, filled with a record of Preview: “Send me a test of the Reminder email with order 1024, in Dutch.” An email that shows no record’s fields, such as a daily summary, is filled with the samples of its step values instead, without a record.
- Make a document of a record: “Make the invoice for order 1024.” It is kept with the record’s files, like one you make yourself.
- Publish the templates and automations waiting for Publish: “Publish the Reminder email.” The card lists all that goes to Live with them, such as the data model’s changes they need.
- Change the organisation details (Administrators): “Our IBAN is now BE71 0961 2345 6769.” The card shows each detail as it is and as it will be.